Installation
There are two ways to perform the C-Monitor Windows client installation.
After the installation, C-Monitor has to be registered on the CM server, the registration methods are described in the text below.
Sending of registration data to CM server
Manual installation
The current version of C-Monitor Windows client can be always found in the section Download, another option is that you create a custom installation file. Read more about creation of custom installation file in the section Installation setup with logo.
Note: This only applies for Maintainers with a custom http address to CM server or with a custom server.
The steps of installation:
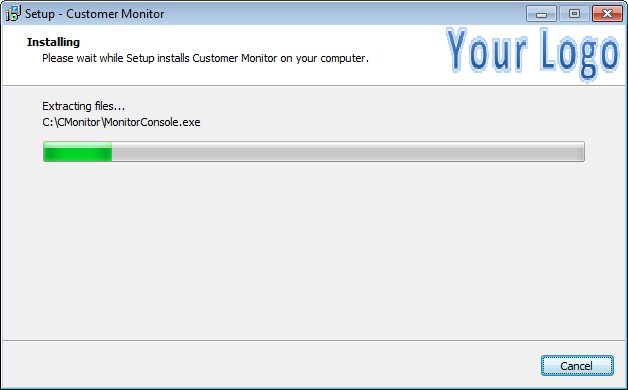
1. Launch the installation file
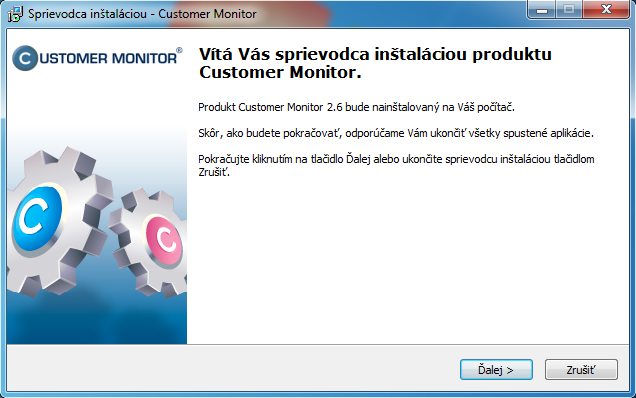
2. Select language of the installation wizard and confirm the start of installation. The programs themselves are in English, except C-backupPlus, which has been set to Slovak.
3. Choose target directory, where the application package should be installed. The program is fully functional for any path on the hard drive.
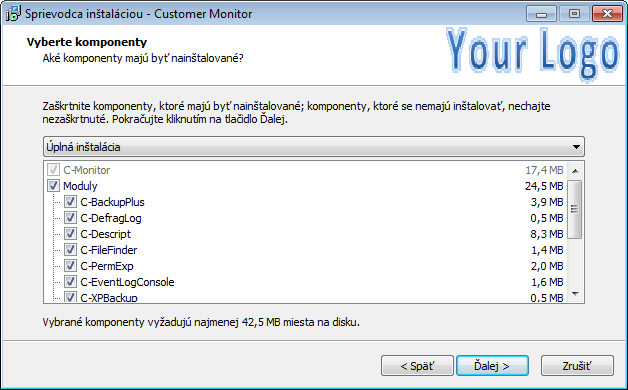
4. Select components, which should be installed. We recommend to install all components, as the C-Monitor license on a computer is always bound to all of the components
5. Installation of the program C-Monitor in the service mode is recommended for all operating systems that support this option. The application mode has certain restrictions, which are better to be avoided.
C-Monitor registration
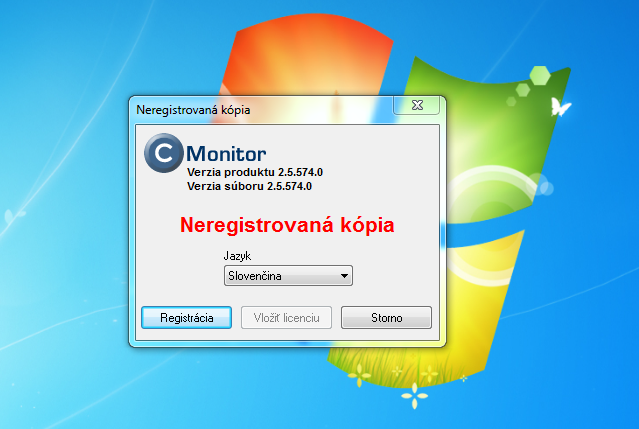
CM portal only communicates with a registered C-Monitor. Unregistered C-Monitor doesn't have a license, and therefore the application's components have limited use. A necessary prerequisite for successful completion of the registration is, that there's already a customer registered on CM portal, whom the computers belong to (with valid customer identifier and CM-ID). When prompted for C-Monitor registration, press the button 'Registration' and a registration form will open. The fields marked with an asterisk are required.
C-Monitor client registration by logging to CM server
Registrácia C-Monitor klienta zadaním identifikátora zákazníka a CM - ID počítača manuálne
C-Monitor client registration by login to CM server
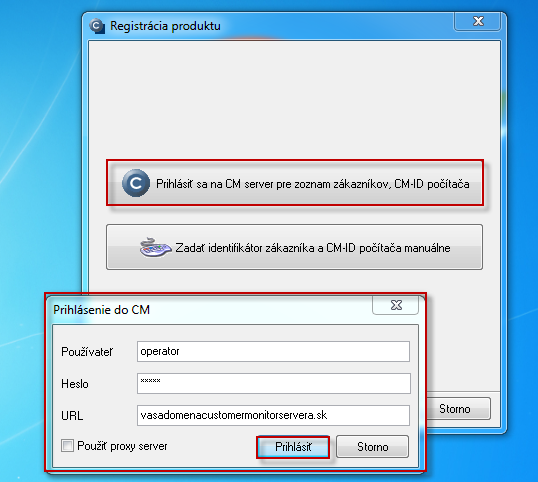
After pressing the button Registration, the window showed on the next image will open. You'll select the highlighted option - C-Monitor client registration by logging to CM server through valid account. The advantage is that you select a concrete customer, under which you're going to register the PC, you'll be automatically offered free numbers for computers and then you just choose type of the PC, as displayed on the following images.
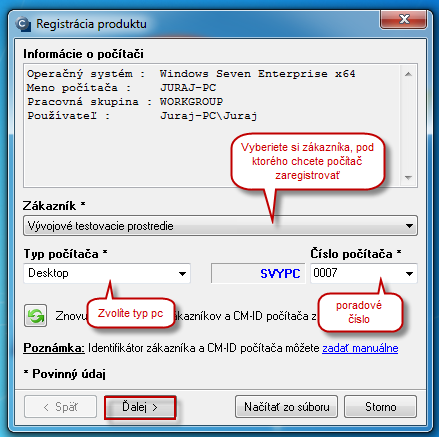
Since version 2.6., Customer Monitor offers the first available CM-ID at the registration, starting from a certain number.
Example : You use different ranges of CM-ID for different branches of your company, e.g. Prague has numbers 100-199, Plzeň has numbers 200-299 and Brno 300-399. You're about to register a PC in Brno, though you don't know what number is the nearest unoccupied, so you type number 300 as the number of computer and press the button Refresh the list of customers and comuter CM-ID. You'll get a view of all available CM-ID higher than 300.
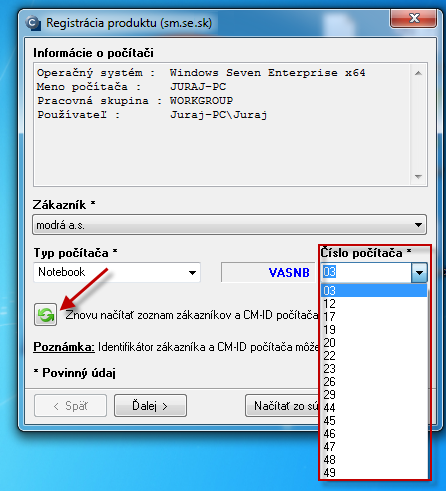
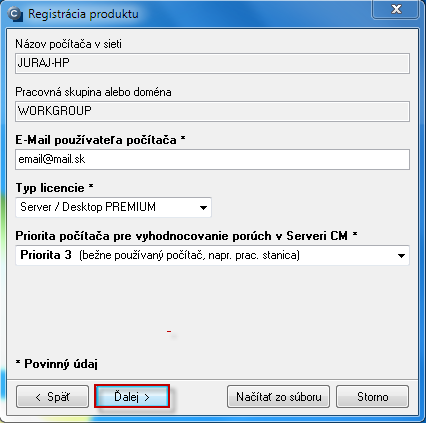
Description of individual required fields :
Name of the computer in network – filled automatically according to the current computer settings.
Work group or domain – filled automatically according to the current computer settings.
Email of the computer user – the user will receive messages from the CM server with customer notifications on the given address. The address will also be used as the sender in messages from the client program C-Monitor, if there's not a mutual address given in customer settings.
Type of license – you have to enter the type of C-Monitor license. Comparison of licenses and their functionalities can be found at Comparison of technical CM licenses.
Computer priority for evaluation of errors in CM Server – choose one of the priorities (description is near the particular types) according to type of the device
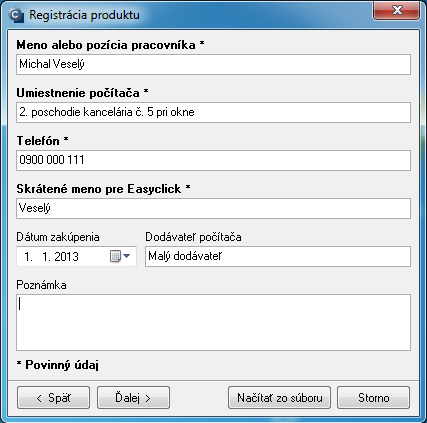
Name or position of the worker - name of the main user of the computer. We recommend to put serious effort to have this field filled correctly. CM will state this name in copies of requests entered to C-Desk by the user. It will also be used, for instance, to address the user in his emails with customer notifications, or when determining on which user's computer has an error occured, if the operator has received a tecnical warning.
Computer location - it's recommended to strictly label the location of the computer at customer, or the workplace of the main computer user (e.g. an office door number). It helps the operator in spatial orientation at the customer. You have an option to sort outputs according to this item, so consider a proper name for it.
Telephone - phone number is displayed in PC details on CM portal and helps the operators to contact their customers.
Short name for Easyclick - here you enter a short name, e.g. surname of the user, which will be displayed at entering of new reqeusts through easyclick. Read more about entering requests via Easyclick at Entering of requests through Easyclick.
Date of purchase - enter the purchase date of the computer. If the date is entered, it simplifies orientation whether the computer still has a warranty or not.
Computer supplier - here enter the name of company, from which you've purchased the computer
C-Monitor client registration by entering customer's identifier and CM-ID of the computer manually
Choose the option displayed on the next image.
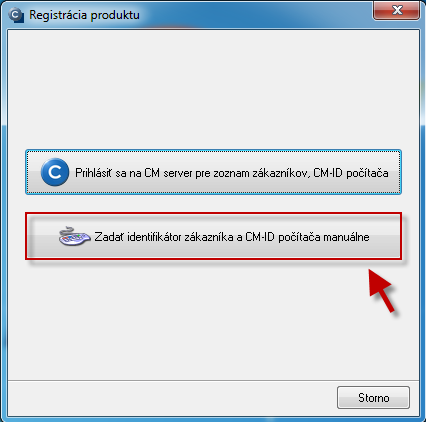
In the next window, you'll fill in:
Customer identifier – it's necessary for registration of C-Monitor to CM server. It is also used in the subject of mails about customer's requests - therefore, we recommend to choose a short and felicitous name, based on name of the customer's company.
Computer CM-ID – unique label of the computer in the system Customer Monitor. The CM-ID is required to be in the same form, every device has its own unique CM-ID.
Creation of a computer's CM-ID
Správne vytvorenie CM-ID počítača je nutné pre jednoznačnú identifikáciu počítača v systéme CM. CM-ID počítača sa tvorí vo formáte XXX...YY.nn, kde:
Correct creattion of a computer's CM-ID is necessary for unambiguous identification of the computer in the system CM. CM-ID of a computer is created in the format XXX...YY.nn, where:
- XXX – customer's character code. The character code of a customer (3 characters) has to be defined at the customer's registration to CM (see 2.3.3 tab Technical settings)
- ... YY – identifier of computer type. We recommend to use the following convention:
- PC – table workstation (desktop)
- NB – mobile workstation (notebook)
- SV – server
It's possible to use more characters as identifier of the device type.
.nn – serial number of the computer. We recommend to number the customer's computers for each type individually, starting with 01 (or 001), while the CM-ID remains unchanged until it's removed. When the computer is removed, a new computer should generally be assigned the next number in series after the removed computer, because even after removing a computer, its information is still archived in CM. Only after this period it's appropriate to assign the position to another computer.
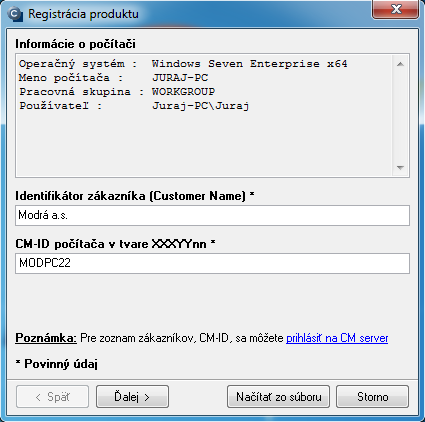
Fill the other items following the above procedure.
Sending of registration data to CM Server
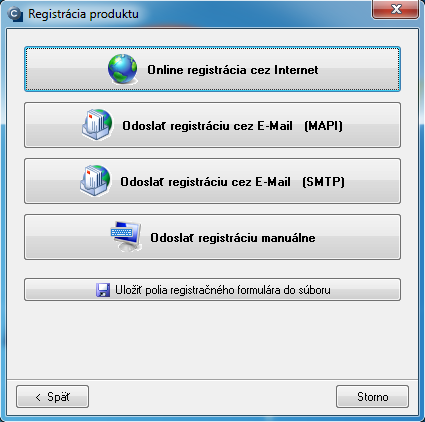
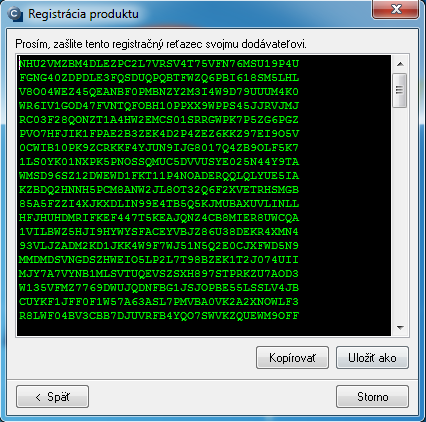
Data filled in the registration form have to be sent to the CM Server. An encrypted string is sent to the Server, on which basis the server generates a license. The license is represented by the file License.apk, which has to be saved in the subdirectory \CNF. There are four ways to send the registration string.
Online registration through the Internet (recommended)
At Online registration through the Internet, the registration string is sent to CM Server via http protocol. If all data is entered correctly, the C-Monitor immediately receives the generated license. It is a matter of course, that the computer has the CM portal website available .
This is the easiest and fastest way of registration and obtaining the license file.
Send the registration by E-mail (MAPI)
If you don't have internet on the computer, you may choose to send the registration string by email, in this case through mail client supporting MAPI (Messaging Application Programming Interface), e.g. Microsoft Outlook. C-Monitor automatically opens window of the mail client. All important information is already filled. Your job is to successfully send this email (it is assumed that the mail client is well-configured). After the registration string is processed on CM Server, a message is sent to the sender's address, prompting to accept the request for computer registration on CM portal
Send the registration by E-mail (SMTP)
It is the same way of registration as by the MAPI mail client, with the difference that presence of the mail client is not necessary. The program offers you a message form, in which all the fields are already filled, except you only need to fill the sender address, to which you'll receive report of processing of the license. For sending of the form, the default SMTP port (25) is sufficient, or you may choose any other mail server, which successfully delivers the message to CM Server.
Send the registration manually
If you're neither online or able to send the registration string by e-mail, you have no other choice than to transfer the string manually as a file to the CM Server. Save the registration string through this option into a file, which you'll then transfer to a computer with internet connection. Log in as an operator or as the maintainer, go to tab Settings, button Licenses. On the right side of the page is a button "Registration string import". The license will be generated afterwards, which can entered by pressing the button Edit, then in the top right press the button Export and save the file 'License.apk' , then transfer it back to the computer, where the string was generated and save inside the directory \CMonitor\CNF. C-Monitor will launch after restart.
Please take note that for full function, there has to be connection with the CM Server, at least by email communication available
Acceptance of a waiting license, loading to C-Monitor
In case you've received an error message after sending the registration string, stating that the license cannot be generated automatically and first you must accept it, login to CM portal as an operator or in certain cases as the maintainer and go to the tab Admin zone -> C-Monitor client -> Licenses and select in the top bar 'Waiting' as type of license. You'll get a view of waiting licenses, open (edit) your license and if you consider it valid, press Accept. However, make sure you know the cause why the license has been assigned as waiting. If there was a mistake or you don't want to use it for any reason, you should rather delete the license to keep order.
After accepting it, you must secure that the license is entered to the computer's C-Monitor. This is carried out by re-launching C-Monitor and pressing the button "Insert license"/"from Internet". When loaded successfully, you'll see the message 'Application key for this installation was successfully saved'. Subsequent restart of C-Monitor is recommended. You can tell that the C-Monitor is installed correctly, if you can see a blue C-icon in the taskbar.
Unattended installation
Sending of installation package through Group Policy
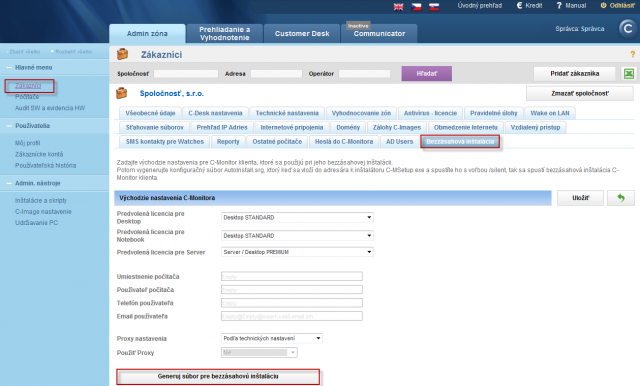
A new way of unattended installation is based on the common installation file C-MSetup.exe, which is in the same dame directory as the configuration file autoinstall.srg and it's launched by the switch /silent.
C-MSetupX.exe /silent
The file autoinstall.srg is created on CM server in customer settings at Admin zone -> Customers -> concrete customer -> tab Unattended installation. When creating the file autoinstall.srg, certain fields for C-Monitor registration may be adjusted, since default fields are set to Empty string.
You'll then send the file autoinstall.srg along with the installation file through Group Policy. The procedure of sending files through GP can be found HERE.
Installation via C-RemoteSetup
C-Monitor Setup allows you to install, update and uninstall C-Monitor unattended on target computers assigned to a domain within one LAN network. The installation is similar to individual installation - you must fill information about the computer (registration data) and then RemoteSetup secures the file upload to the computer, and its registration on CM server. New installations via C-RemoteSetup can be carried out for a C-Monitor client version 2.0.1.512. and higher. First, install C-Monitor client version 2.0.1.512 and then update it through the update package. Installation file for C-RemoteSetup can be found at Download. This application is soon going to be updated for the newest version of C-Monitor client.

