Ping PL,RTT via Watches
Notification of total failures
Total outages of internet connections can be figured by methods that were already described in other articles on this web :
For longer outages use Monitoring of computer availability with activation of internet line monitoring
To make direct PING tests to public IP addresses, follow the instructions at Availability tests (Watches)
Notification of lower internet connection quality
In the solution CM, quality of internet connection is monitored by tests (Watches conditions) of Ping packet loss and Ping Round Trip Time (also called response time, hereinafter RTT) executed from the C-Monitor client. There are two basic methods to execute these tests, and it's up to you which one do you prefer / need :
1. C.Monitor client is on a computer from the monitored line (inside the network) and the tests are running to an external IP address, which has very reliable connection (no packet loss and very short RTT)
2. C-Monitor client is on a server with very good connection and the tests are performed to IP address of the monitored line.
Note: as these are two directions of the tests, you also get different results, for which you need to take into account the capacities of upload / download.
A reliable internet line should have zero packet loss even for higher loads, and response RTT vary according to type of the line. You should have the following typical RTT values for your measurements:
DSL ...cca 15-70ms
UPC (coaxial) ...cca 10-30ms
Optic ...cca 3-10ms
FWA 10.5GHz, 26GHz - cca 10ms
mobile ...HSDPA cca 70-100ms, GPRS over 150ms
Wimax - over 50ms
Wifi 5.4GHz links ...cca 4-10ms
Recommendation: If you haven't worked with Watches yet, then read the Introduction to setup of Watches, conditions, actions first
Skip to Setup of quality monitoring via CM Portal (for all OS)
Setup of monitoring of internet line quality via C-Monitor Console on Windows
Setup of packet loss monitoring
The very setup is done through C-Monitor Console, launch Watch Wizard, name the new watch e.g. "Internet line quality", we recommend to choose the name as short as possible also with some specific name, as this name of the Watch will be used in notification emais, SMS messages and it's appropriate that it doesn't take too much space, and at the same time, you can easily tell what does the message belong to. Then press Next.
Select watch Ping packet loss.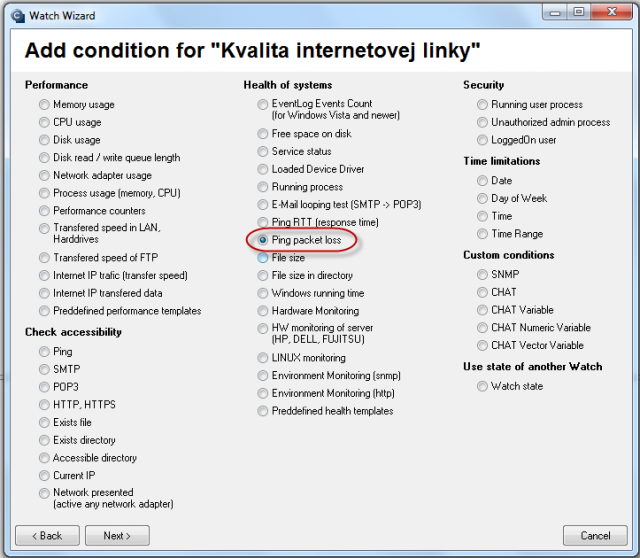
In the next window, enter address which is going to be pinged. You may write name of the location, or directly the IP address. Choose compairing operator, percentage value (10% for an average line) and testing period (recommended 1min). Other values in square brackets are optional and will be filled by default values (specified in pop-up bubbles, which appear after hovering over these fields), if you don't need to make custom changes. The most relevant of these parameters is the length of history, which is defaultly 12 (meaning that Packet Loss is calculated from the last 12 tests, i.e. last 12 minutes for the recommended settings). You may then have pings written into a log file, in case that connection with CM Server was lost, so you won't lose detailed results of these tests.
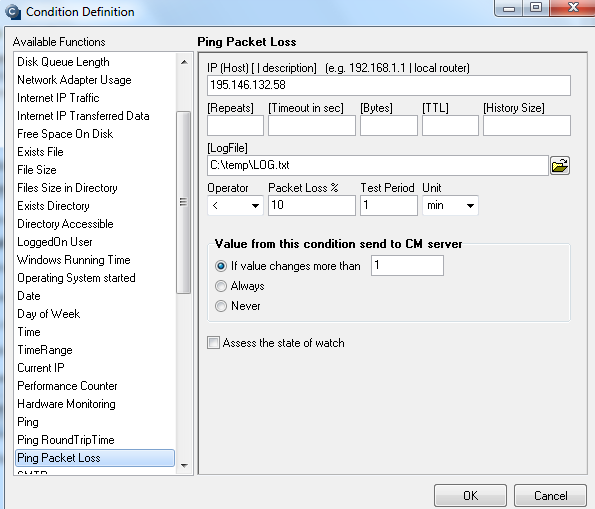
When all parameters are configured, press OK
Add check of Ping RTT (Round Trip Time - i.e. response time) to this watch by Add condition
Setup of ping response time
In Watch wizard select Ping RTT (response time) and press Next.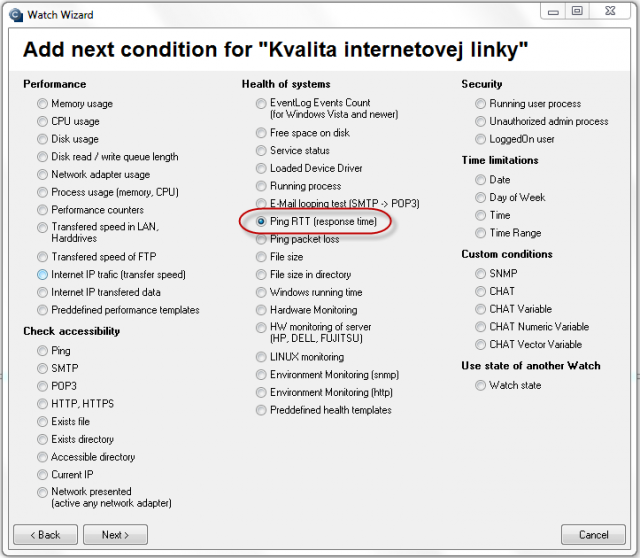
In the next window, you'll choose the address, which is going to be pinged, either the location's name, or directly its IP address. Select what value of response time is going be monitored in the field Value - either minimal time, maximal, or average value. Then select operator, value in ms and testing period (typical response values for different line types are in the introduction to this article). Other values in square brackets are optional and will be filled by default values (specified in pop-up bubbles, which appear after hovering over these fields), if you don't need to change them.
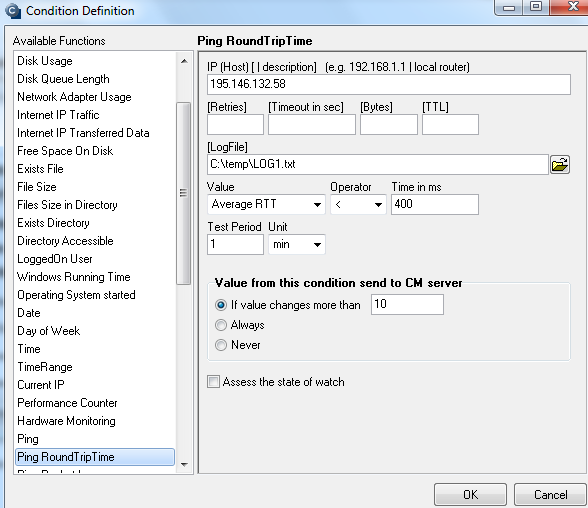
After setting the required parameters, and clicking on Next, you'll get to common Watch settings. For monitoring of internet lines quality, it's suitable to set delay of notifications (Delay for fail), especially where the connection quality is low, so that you won't receive notifications over every little hesitation of the line, as very short and occasional failures of the line don't really affect function of the systems working on internet connection
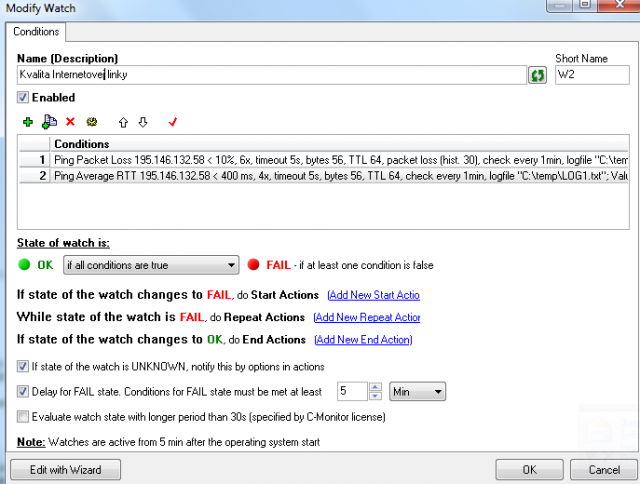
For setup of actions, follow the instructions at Setup of Watch actions.
Setup of line quality monitoring via CM Portal (for all OS)
Creation of watch can be configured even without direct access to the PC, by addition through CM Portal. After login to CM portal, open Admin zone and in the left menu Watches - Settings. Enter parameters of the required computer into the upper filter. When the PC/server is filtered out, it'll be displayed with its already existing watches, if there are any. By clicking on Display watches, you'll get to the option to add a new one.
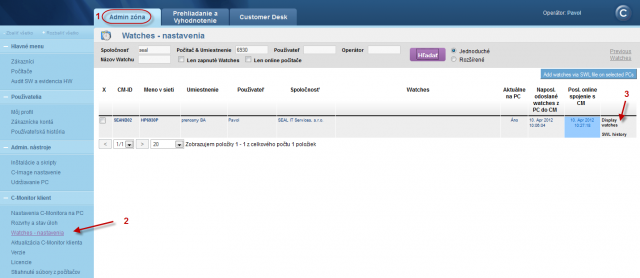
Click on Add watch
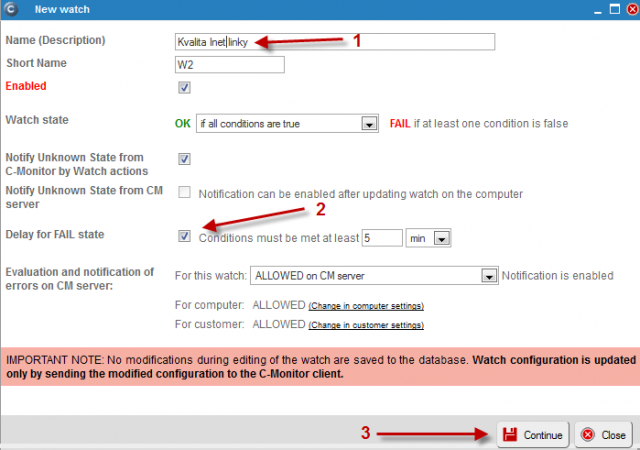
In the popped window, name the watch e.g. "Inet line quality" we recommend to choose the name as short as possible also with some specific name, as this name of the Watch will be used in notification emais, SMS messages and it's appropriate that it doesn't take too much space, and at the same time, you can easily tell what does the message belong to. Then it's suitable to tick Delay for False, especially where the connection quality is low, so that you won't receive notifications over every little hesitation of the line, as very short and occasional failures of the line don't really affect function of the systems working on internet connection. Then press Continue
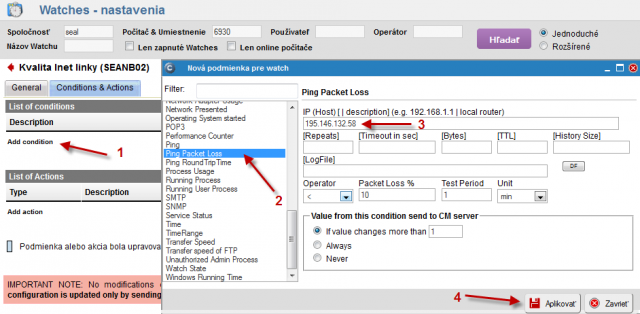
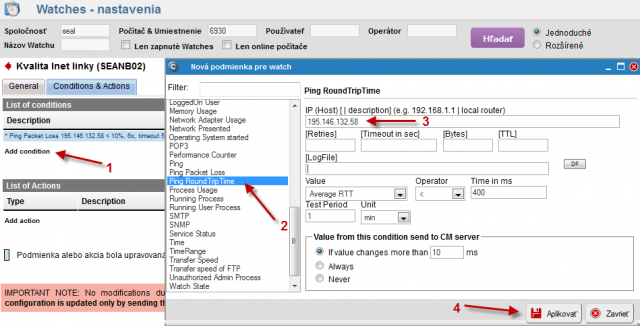
In the next window, press Add condition. In the left menu, select condition Ping Packet Loss. Enter address which is going to be pinged into the field IP (host). You can also write DNS name of the location. Choose compairing operator, percentage value (10% for an average line) and testing period (recommended 1min). Other values in square brackets are optional and will be filled by default values, if you don't need to change them. Then press Apply
By clicking on Add condition, you'll similarly add another condition to check Ping Response time. Select Ping Round Trip Time in the left menu.Enter the address, which is going to be pinged, into field IP (host). You can also write location's DNS name. Select what value of response time is going be monitored in the field Value - either minimal time, maximal, or average value. Then select operator, value in ms and testing period (typical response values for different line types are in the introduction to this article). Other values in square brackets are optional and will be filled by default values, if you don't need to change them. Then press Apply
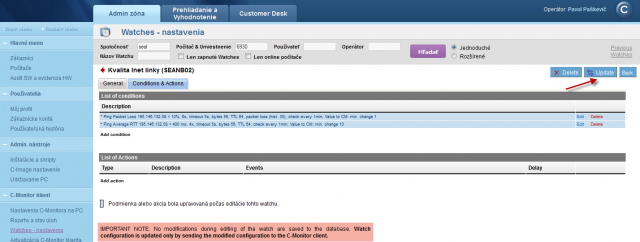
Here you can see the list of already created conditions. Click on Update to submit the created watch to the PC. Two warning windows will appear afterwards.
In the first one, confirm submission of the watch to the PC/server
The second window contains a warning, that you shouldn't edit the watch until it's received on the PC/server
When the watch is successfully received on the PC, you'll see a list of watches for the PC and their status


